To my knowledge there are 8 different types of arrows you meet in organic chemistry. Here’s a little guide to them.
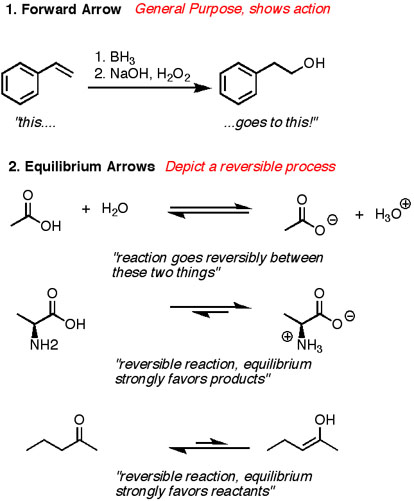
1. The forward arrow, otherwise known as the “reaction arrow”. The purpose of this arrow is to show action. Now, “BH3, then NaOH/H2O2″ might not exactly seem like your idea of “action”, but put yourself in the alkene’s position – it’s double bond is being ripped asunder in order to form new bonds to boron and hydrogen, and then with the addition of H2O2, the bond to boron is replaced with one to oxygen. That’s a pretty eventful day in the life of an alkene.
There isn’t any hard and fast rule about what is supposed to go above or below the arrow, although reagents tend to go above and solvents tend to go below. You’ll often see a sequence of reactions placed over the arrow and numbered “1) , 2), 3), etc. These represent individual steps that could often be shown with individual arrows of their own, but they are placed in series here over the arrow to save space.
2. The Equilibrium arrow. This shows a reaction that is reversible, usually in the context where the reversibility is being highlighted (such as in a reaction mechanism). To further highlight the position of an equilibrium, you may also occasionally see one of the arrows being longer than the other, showing that the equilibrium favors the starting materials or products.
3. The Resonance arrow. Not to be confused with the equilibrium arrow, this double-headed arrow shows two (or more) species that are resonance structures of each other. That is to saythey differ in the arrangements of their electrons and nothing else. Although it’s a separate discussion, it’s important to note that the molecule *does not* shuffle back and forth between these forms, but instead the “true picture” of the molecule is a combination or hybrid of these structures.
4. The Dashed Arrow. This is often used to show a speculative or theoretical transformation, where conditions might have yet to be discovered. Alternatively in a test situation it’s a way of visually depicting the question, “How would you do this?”
5. The Curved Arrow (double headed). The curved arrow formalism is such an important tool that entire books have been devoted to it (for instance, I highly recommend checking out “Arrow Pushing in Organic Chemistry” by Daniel Levy). The point of the curved, double-headed arrow is to show the movement of an electron pair. They start at the tail and end up at the head. Hugely important for following how mechanisms work. Deserving of a series of posts in itself.
6. The Curved Arrow (single headed). The single-headed (or “single-barbed”) arrow depicts the movement of a single electron. Useful in discussions of radical chemistry mechanisms in particular. Identical in all other respects to the double-headed arrow.
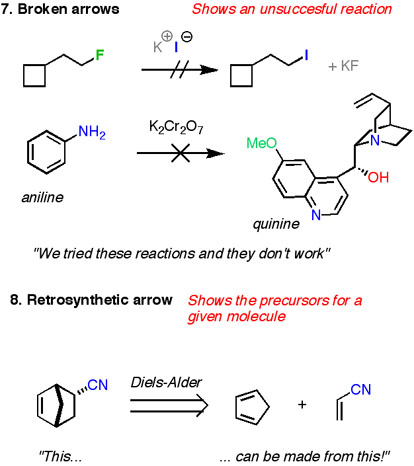
7. The Broken Arrow. This is used to show reactions that don’t work: fluorine is a bad leaving group in nucleophilic substitutions, for example. And quinine can definitely not be synthesized from the oxidation of aniline.
8. The Retrosynthesis Arrow. The open arrow here doesn’t actually show a “reaction”, per se, but instead more of a mental exercise. The retrosynthetic arrow is meant to depict the process of breaking down a complex molecule to simpler starting materials. This is useful as a planning device to highlight a key strategy used for building a molecule.


No comments:
Post a Comment